Company Configuration tutorial
Configure your LBS Suite step by step V9.1.2.12
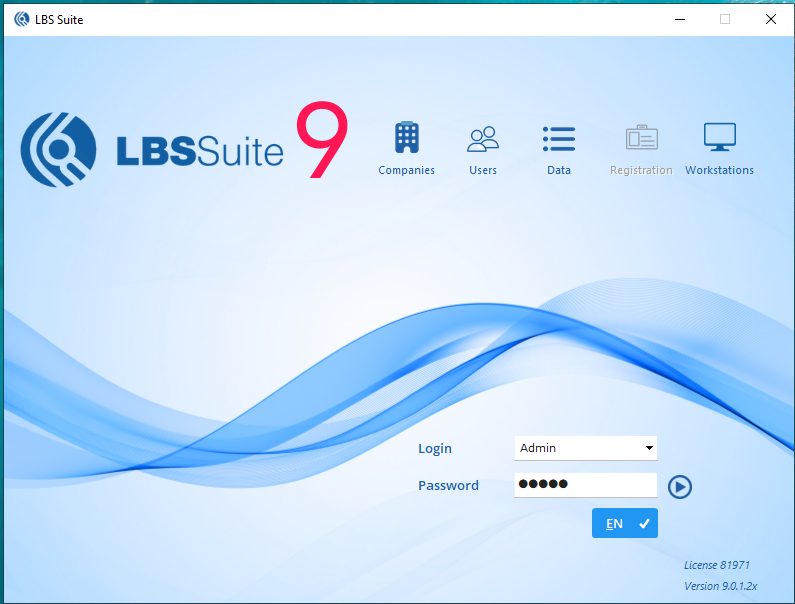
Log into your Admin account
 The top menu icons (Companies, Users, Data, Registration and Workstations) only appear when logged in.
Select ‘Admin’ Insert your password (by default: Admin) Press Enter or click on the “play” blue button Those icons appear once logged in
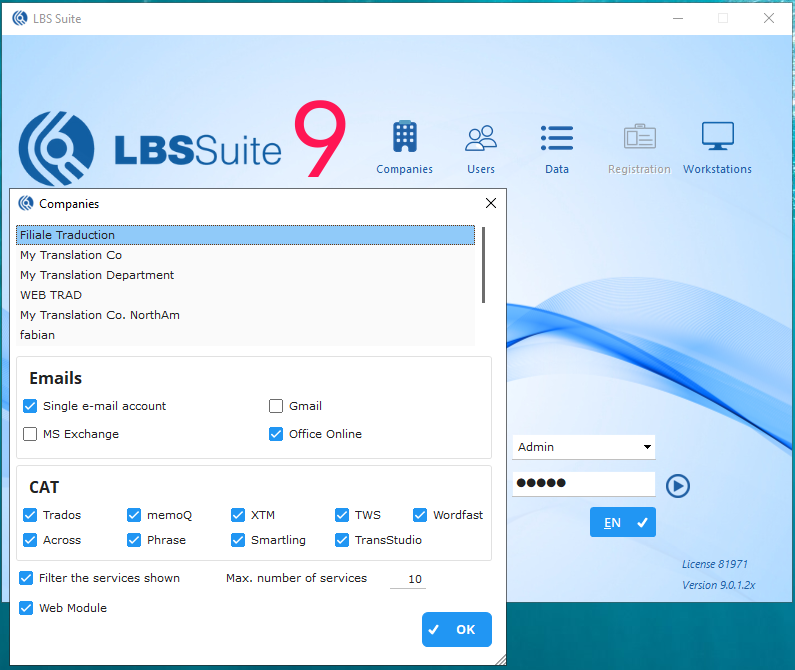
Configure your companies
- Click on the Companies menu. The window “Companies” appears with all companies registered in LBS Suite.
Double-click on the company name to configure.
-
Click on Gmail if your company uses Gmail as emailing system.
-
Select all CAT Tools that you will use.
-
Tick “Filter the services shown” and enter a “Max. number of services” to display a limited number of services at once in a quote or order. This allows LBS to open windows faster for big projects with many services.
-
Web module will be ticked automatically if you bought the web module.
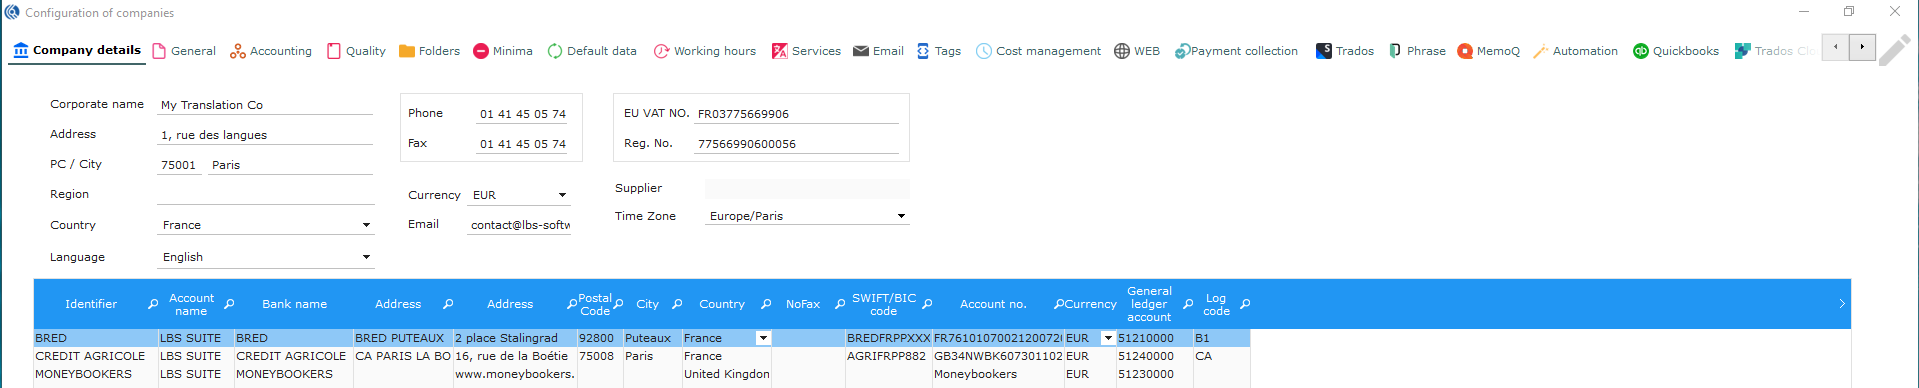
Companies menu: Company details tab
Click on the pencil on the right to edit* your company’s details Once the changes are done: Click on the green tick icon to validate the changes Click on the red cross icon to discard the changes

- If needed, enter one of your subsidiaries as a supplier of the company. Right-click to search and select the supplier record of the subsidiary. Your subsidiary will now receive projects assigned automatically in its LBS Suite.
- Enter the time zone of the company. Important when companies in different time zones.
*Across all screens, please activate ‘edit mode’ with the pencil icon, and save information with the green round check or discard changes with the red cross.
Companies menu: Company details
- Double click to insert data. You can press the Tab key to go to the next field. NB: Right-click on the line to select “delete”. You can add as many bank accounts as needed.
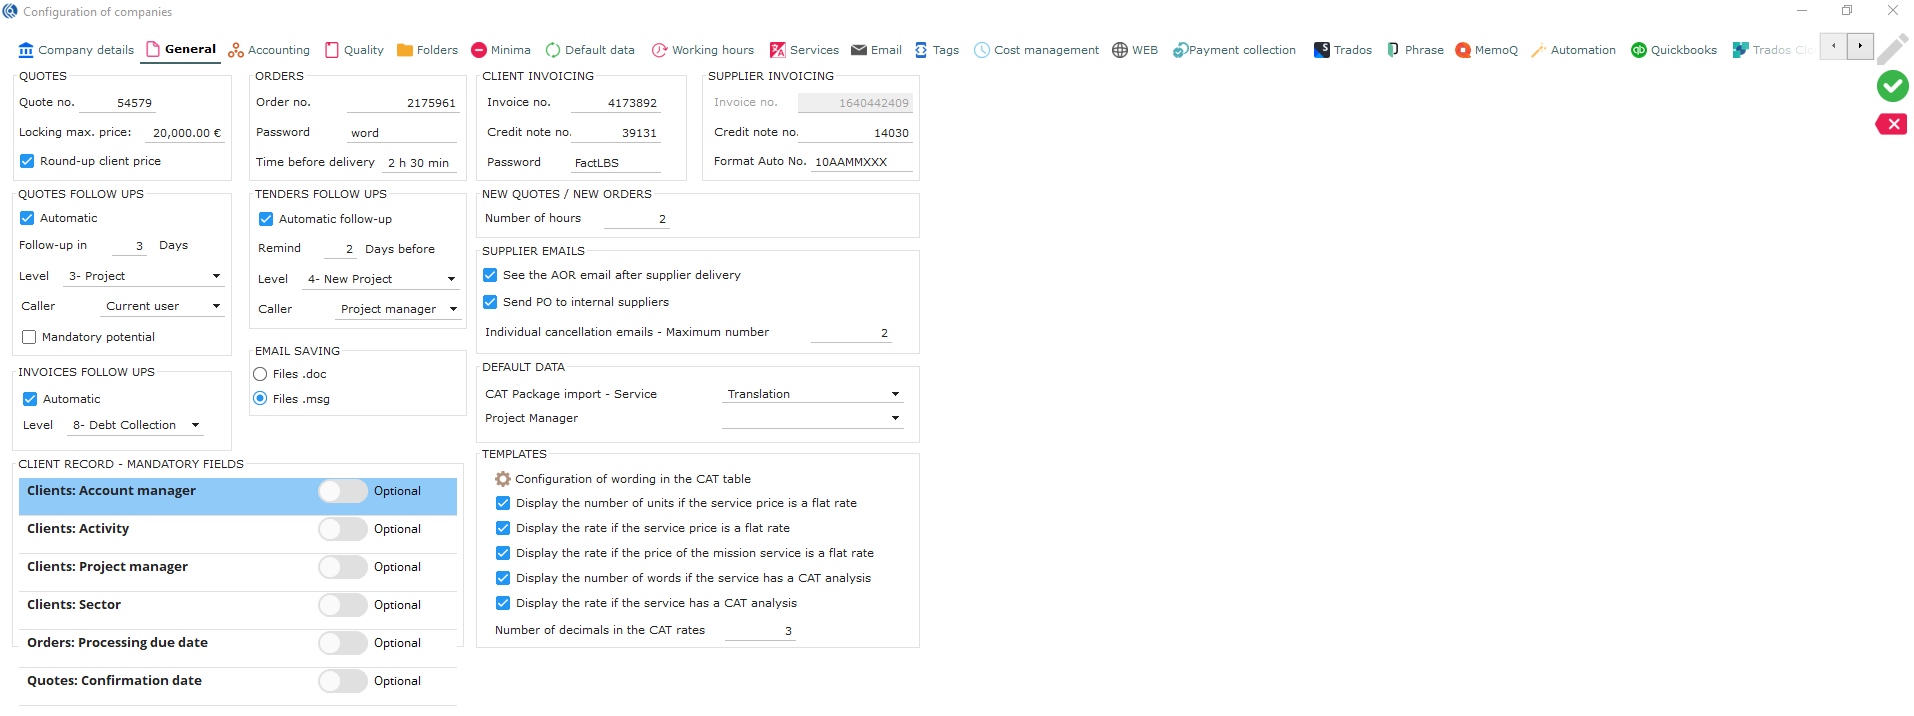
Companies menu: General tab
LBS numbering
-
Click on the General tab.
-
Click on the pencil to edit.
-
Define the beginning of your:
- Quote numbers
- Order numbers
- Client invoice numbers
- Client credit note numbers
- Supplier invoice numbers
- Supplier credit note numbers
It can only be numbers that will be locked and repeated. LBS Suite will increment the numbers automatically. Example: quote 526541, 526542, …
Tip: start with a different number for each category, so you can easily refer. Also, your client invoice number is not required to follow the last one from your previous software.
Companies menu: General tab
Quote options

Locking max. price: Enter a price to prevent regular users “salesperson” and “PM” from validating quotes (see config. of users). Above this price, only the users with the corresponding right will be able to validate the quote.
Round-up client price: Tick this option to round-up the total price of the quotes, if desired.
Order options

Password: Set a password to block to prevent users from modifying validated quotes.
Time before delivery: Enter a time to change the delivery in orange passed this time. It is a warning visual system to avoid late deliveries.
Invoice options

Client invoicing
Passsword: Set a password to block access to modifying PDF invoices.
Supplier invoicing
Format Auto No.: is for automatic supplier invoices or and supplier invoices created from the portal. You can use the following codes:
-
YYYY for 4 numbers of the current year
-
YY for the 2 last numbers of the current year
-
MM for the current month
-
X for the number that LBS Suite will increment. Add as many as you need.
-
Any number that will be fixed.
Example: 10YYMMXXXX > 1025080001, 1025080002… 10YYYYMMXXX > 10202508001, 10202508002…
Quote follow ups
-
Tick Automatic quote follow-ups to send automatic follow-ups after sending a quote.
-
Enter the number of days after sending the quote you want to start the first follow-up on the quote.
-
Select the level of the follow-up (levels of follow-ups are set in Data “CRM – Follow-up levels”).
-
Select the person in charge of the follow-up (chosen according to quote information): Salesperson Project Manager Account Manager Sales Manager Current user
-
Tick “Mandatory potential” to force user setting a potential to the quote.

Invoices follow ups
 Tick Automatic invoices follow-ups to send automatic follow-ups after send a client invoice.
- Select the level of follow-up for automatic invoice follow-ups (levels of follow-ups are set in Data “CRM – Follow-up levels”).
Email saving and supplier emails
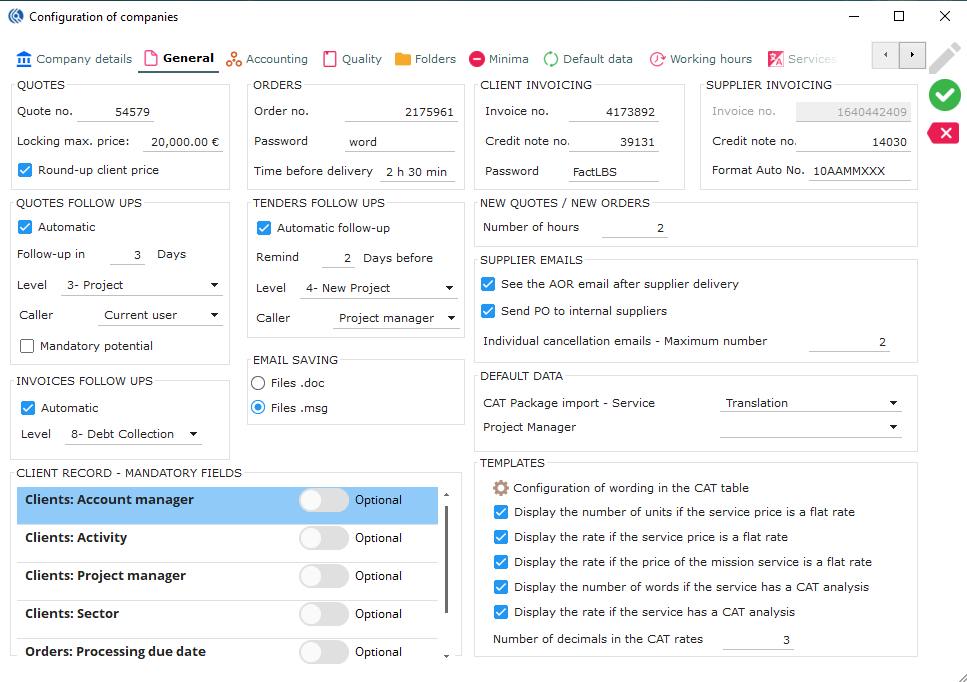
Email saving
Select the format in which your emails will be saved in the folders. NB: .doc is less heavy, .msg is heavier but you will be able to reply on emails (Outlook only).
Supplier emails
Tick “See the AOR email after supplier delivery” to review emails before (no automatic sending). After supplier delivery on the portal, an automatic AOR email is sent (if the email template is configured).
Tick “Send PO to internal suppliers” to send a PO to internal suppliers when you give them a task.
Choose a maximum number of individual cancellation emails sent at once. Past this number, a global email will be sent.
Tender follow ups
 Tick “automatic follow-up” to send automatic follow after sending a tender offer.
-
Set the number of days before which will appear in the task of the person in charge of the tender offer.
-
Set the level of the follow-up (levels of follow-ups are set in Data “CRM – Follow levels”).
-
Select the user role set in the client record that will follow up.
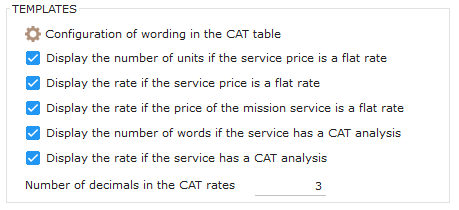
Templates
 The templates are managed by LBS support team. This configuration sets display options.
-
The total number of words in the service will be shown when you set a flat rate.
-
Show only the flat rate for services.
-
Show rate if the mission (interpretation) is a flat rate.
-
Show all details of services: total number of words in the service + the CAT report.
-
Show the price of the service with the CAT report.
-
Choose the number of decimals shown on your quotes and orders (5 decimals are recommended).
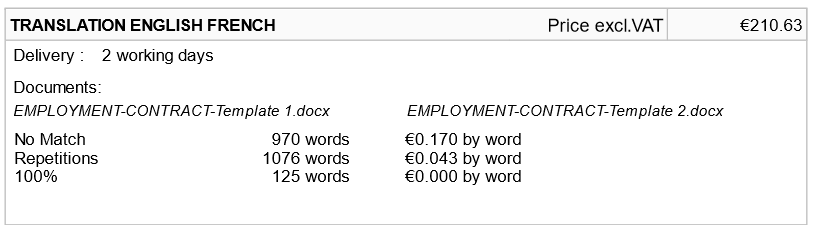
Configuration of wording in the CAT table
Click on the brown cogwheel icon to set:
- the name of the units used in the CAT grids of the templates.
- the unit used for the price in the CAT grids of the templates. NB: Up to 8 languages per template.

Default Data
 In “default data”, choose what service will be created when importing a package with LBS. This will be the default service but it can be changed manually afterward. You can also select a default Project manager for this task.
Companies menu: Accounting tab

Financial year
- Set the start date of your financial year.
- Set the end date of your financial year.
- Set the log codes for your clients.
- Set the log codes for your suppliers.
NB: Click on “End” button to close the financial year. Warning: all your invoices and credit notes are validated Then, set the new financial starting and ending dates of the new year.
Log codes
 Set your general accounts code for loss.
Set your general accounts code for profit.
Set your general accounts code for penalties.
Set your general accounts code for loss.
Set your general accounts code for profit.
Set your general accounts code for penalties.
In “collections fees”, choose different penalty rates in case of payment default from your clients (more info slide 62): a. set the amount of penalty in “falt-rate allowances” b. set a percentage for an annual rate. This percentage will be applied on the unpaid amount times the months not paid. c. Insert a percentage for a clause penalty. This percentage will be applied on the unpaid amount once.
Client and supplier general accounts
 Double-click to insert your clients and suppliers general accounts codes for different locations.
- Click on the green check to apply these accounts on all invoices.
Companies menu: Accounting tab
 11. In “EU VAT accounts”, set your deductible and collectable EU VAT accounts codes.
-
In “Outside EU VAT accounts”, set your deductible and collectable outside EU VAT accounts codes.
-
Set your “Default VAT rate” to be applied on client invoicing. Not mandatory, editable in the client record. (VAT rate are set in Data “Accounting - VAT rate”)
-
In “additional tax”, set the percentage of any additional tax that will be calculated in the supplier invoice on the price before VAT (e.g.: INPS in Italy)
Companies menu: Accounting tab
 In “E-invoicing”, use the settings to send and receive electronic invoices in line with the e-Invoicing Directive and European standard. Should your country apply the e-Invoicing directive, you need to fill the following:
- Set your tax system/transmitter name.
- Set your tax system/transmitter country.
- Set your tax system/transmitter VAT No.
- Set numbering to be used.
“Withholding tax” only applies to French companies. Set if needed.
Companies menu: Accounting tab
 20. In “automatic client account”, set the automatic format of automatically created client accounts.
NB: LBS automatically creates client accounts when new clients are created.
20. In “automatic client account”, set the automatic format of automatically created client accounts.
NB: LBS automatically creates client accounts when new clients are created.
Companies menu: Accounting tab
 21. In “supplier invoice”, tick “allow suppliers to create their invoices on the supplier website”, if you want them to be able to do so.
NB: You can untick this functionality suppliers in their record.
21. In “supplier invoice”, tick “allow suppliers to create their invoices on the supplier website”, if you want them to be able to do so.
NB: You can untick this functionality suppliers in their record.
-
Set a max number of days for them to predate their invoice (put 0 if you do not allow that).
-
Tick the type of services for which you do not allow invoicing before validating the service.
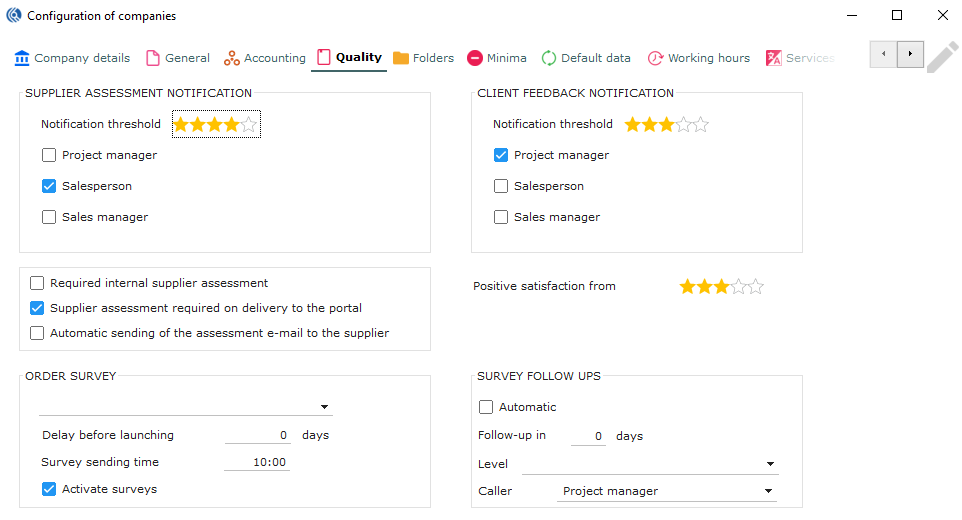
Companies menu: Quality tab
 In “supplier assessment notification”, set the supplier notification threshold from which you receive an alert.
Tick the user role(s) that will receive these alerts.
Companies menu: Quality tab
Tick “required internal supplier assessment” to force users to asses internal suppliers to be assessed by your PMs before validating an internal service.
Tick “supplier assessment required on delivery to the portal, to force the proofreader to assess the main service (mostly translation).
Tick “automatic sending of the assessment e-mail to the supplier” so the supplier automatically receive their assessment.

Companies menu: Quality tab
 In “Order survey”, select a survey order to be sent automatically after validation of the order.
Set a number of days after which the survey is sent (after validation of the order).
Set at what time of the day the survey should be sent.
Tick “activate surveys” to activate the use of surveys.
NB: It is possible to customise surveys in the contact record.
Companies menu: Quality tab
-
In “client feedback notification” set the client notification threshold from which you receive an alert.
-
Tick the user role(s) that will receive these alerts.

Companies menu: Quality tab
- Set from how many stars an assessment will be considered as positive. NB: This threshold will be crucial for quality statistics (negative and positive feedbacks) and for the use of automatic follow-ups (see next slide)

Companies menu: Quality tab
-
In “survey follow ups”, tick “automatic” to send automatic follow-ups for negative client feedbacks.
-
Set the number of days after which the follow-up is sent to the client.
-
Select the level of follow-up that will be created (levels of follow-ups are set in Data “CRM - Reminders levels”)
-
Select the user role that will be responsible of the follow-up.
Companies menu: Folders tab
Set all paths for folders automatically generated by LBS. These 12 folders will be the roots of all the paths for files managed by LBS.
NB: This must be set before setting the folder structure below
Under “definition of folder structure”, set the subfolders structures that LBS will create automatically and managing files with LBS.
All the names with red icons represent types of documents LBS can manage and are linked to LBS functions.
Check next slide for more details about folder structures.
Warning: When you enter the path, please write the server name + the letter, instead of just the letter (e. g.: \Serveur2012\E..., not E:...)
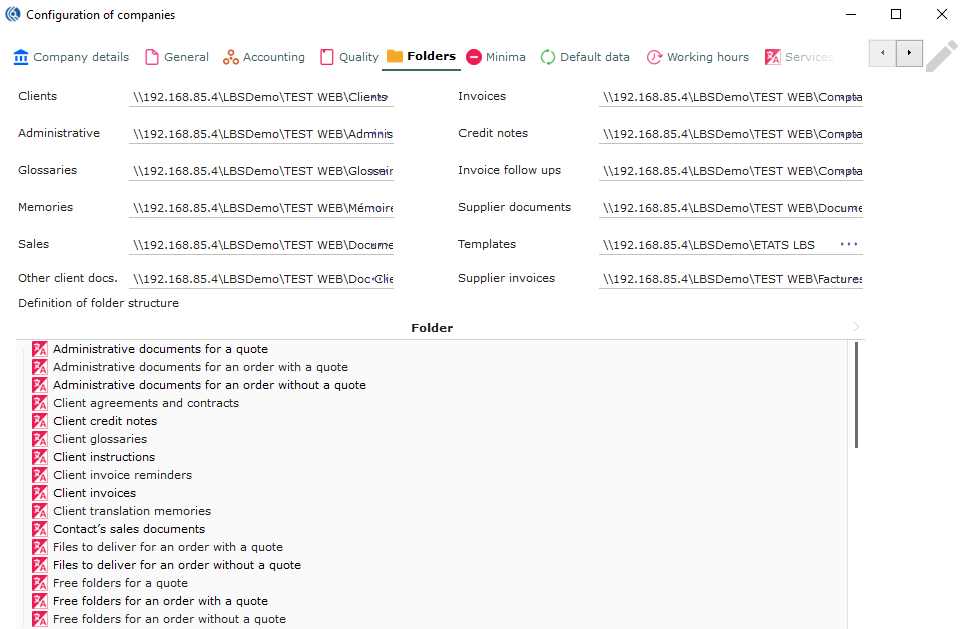
Main folders
Type of documents
Companies menu: Folders tab
 All types of documents will depend on main folders configured beforehand.
Then, LBS will automatically set the paths of the main folders in the corresponding type of documents paths.
These types of documents can then be placed in subfolders, that you can configure in the table on the down part of the folders tab?
To understand each folder that will be created by LBS Suite, please refer to “Configuration help – Folders”
All types of documents will depend on main folders configured beforehand.
Then, LBS will automatically set the paths of the main folders in the corresponding type of documents paths.
These types of documents can then be placed in subfolders, that you can configure in the table on the down part of the folders tab?
To understand each folder that will be created by LBS Suite, please refer to “Configuration help – Folders”
Main folders
Type of documents
Companies menu: Folders tab
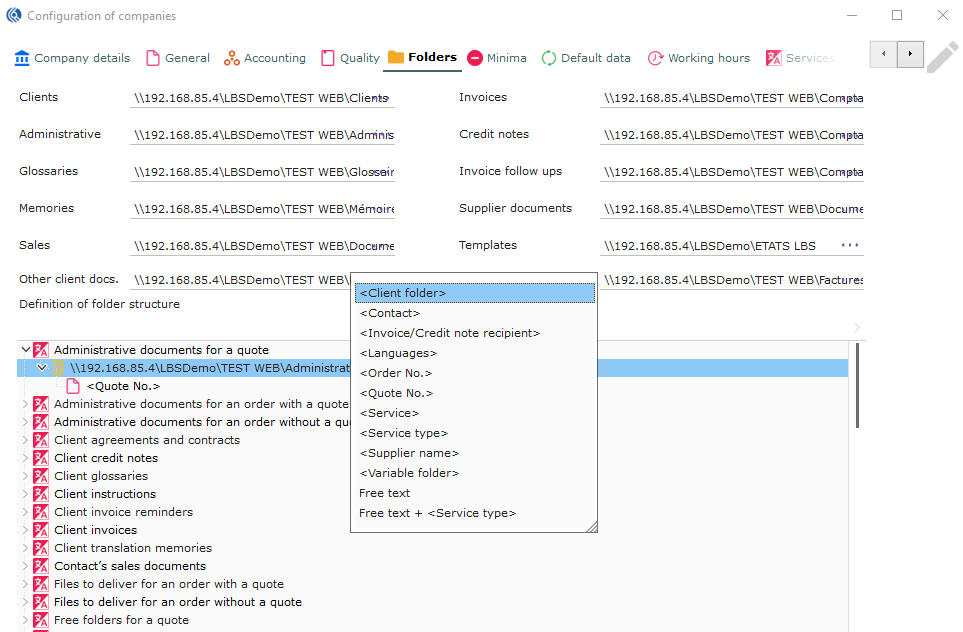
-
Right-click on the folder path oh the type of document and select “create a sub-folder”
-
Select the variables needed. You can add as many sub-folders as you want. NB: Right-click on it and select “delete” to delete it. See in the next slide the variable codes in English.
Example: All “administrative documents for a quote” will be saved under the folder with the quote number created under Administrative path. \Serveur2012\E\LBSDemo\TEST WEB\Admin\894821
Companies menu: Folders tab
<Client folder> is the “folder name” in your client record
<Contact> is the contact person as in the contact record
<Invoice Credit note recipient> is the invoice/credit note recipient
<Languages> is the source and/or target language of the service
<Order No> is the order number
<Quote No> is the quote number
<Service> is the name of the service (translation, transcription, editing, etc.)
<Service type> is the service type (Translation, proofreading, interpretation, others)
<Supplier name> is the name of the supplier
<Variable folder> is the name of the batches for open orders
“Free text” allow you to name a folder with free text
“Free text” + <Service type> is a mixed of free text + service type

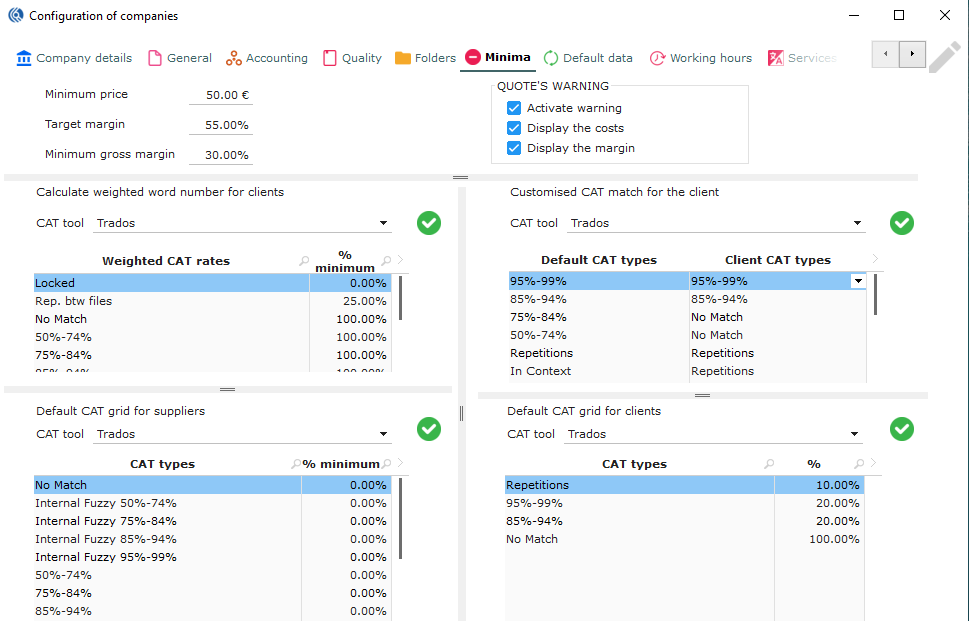
Companies menu: Minima tab

-
Set your minimum price for all your clients. No pricing can be set below that minimum price.
-
Set a target margin. This will be useful for your manager statistics. Also, your team can be notified if the price is below expectation (see step 4 below).
-
Set a minimum gross margin, same principle as above.
-
In “quote’s warning”: Tick “activate warning” to activate warnings on quotes. Price will be displayed in red and a warning will appear when the target margin is below the targeted margin. This is only a warning. It does not block the user from continuing. Tick “display the costs” of the project to compare them and adjust prices while working on the quote. Tick “display the margin”. The margin is generated thanks to the price compared to the target margin.
Companies menu: Minima tab
- In “calculate weighted word number for clients, select your CAT tool and set your default CAT report weighted word number for clients that can be imported in your client record: Roll down the drop-down list to select the category Set the percentage of the rate to be calculated regarding the CAT category Validate with the green check icon
Companies menu: Minima tab
- In “default CAT grid for supplier”, select your CAT toll and set your default CAT report weighted word number for suppliers that can be imported in your supplier record: Roll down the drop-down list to select the category Set the percentage of the cost to be calculated regarding the CAT category Validate with the green check icon

Companies menu: Minima tab
 7. In “customized CAT match for the client”, select your CAT tool and set the default matching correspondence between CAT analysis and client CAT. You can here gather some categories together for the client. This correspondence can be imported in the client record.
Companies menu: Minima tab
- In “defaut CAT grid for clients”, based on your customised CAT match for the client, configure the default CAT grid for your clients. This CAT grid is a result of the configuration on the above table “customized CAT match for the client”.

Companies menu: Minima tab
Difference between Weighted words and CAT grids: “Weighted words” won’t show the details of the calculation to the client, only the result. “CAT grid” will show the different categories of words and the calculation (percentages and rate)

Companies menu: Default data tab
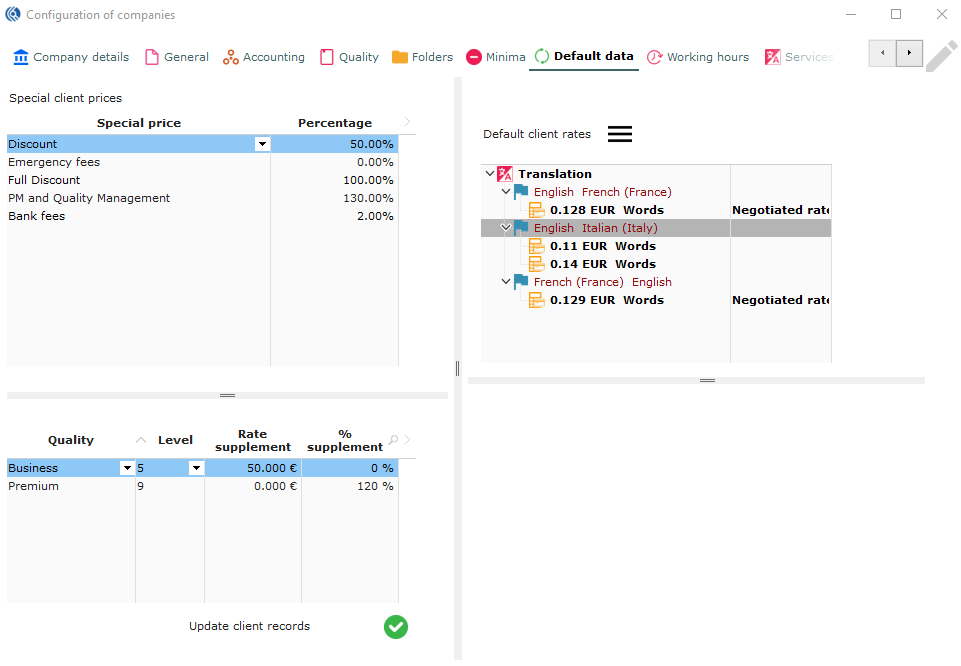 In “special client prices”, set default special prices for clients that can be imported automatically in the client record:
Select special price type
Insert the percentage to be applied
(e.g.: to apply 95% of normal price, set -5%, to apply 120% of normal price, set +20%)
In “special client prices”, set default special prices for clients that can be imported automatically in the client record:
Select special price type
Insert the percentage to be applied
(e.g.: to apply 95% of normal price, set -5%, to apply 120% of normal price, set +20%)
Special prices are set in Data – “Services - Special prices”.
Companies menu: Default data tab
- In the quality table (not mandatory), add levels of quality of services for the client. Set the level, the rate supplement or percentage.
NB: These levels will affect the whole pricing in the quote.
Quality needs are set in Data – “Suppliers - Quality”.

Companies menu: Default data tab
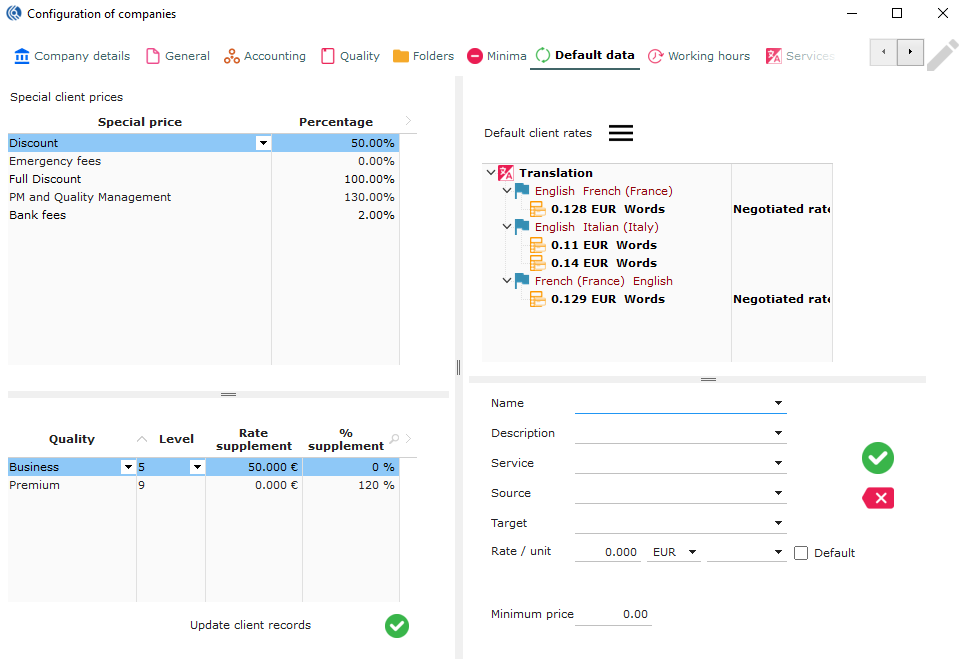 3. In default client rate, set as many default rate as you want for your clients. These rates will be available for import in the client records.
Right-click on the “Default client rates” table
Select “New rate”
Set a title to your rate.
Select type of service.
Services are set in Data “Services - Services”
Select the target language
Select the source language
Set the rate
Select the currency
Select the unit
Tick default to set this rate as default (if it is the only rate for this service and language pair, it will be automatically set as default)
3. In default client rate, set as many default rate as you want for your clients. These rates will be available for import in the client records.
Right-click on the “Default client rates” table
Select “New rate”
Set a title to your rate.
Select type of service.
Services are set in Data “Services - Services”
Select the target language
Select the source language
Set the rate
Select the currency
Select the unit
Tick default to set this rate as default (if it is the only rate for this service and language pair, it will be automatically set as default)
Companies menu: Working hours tab
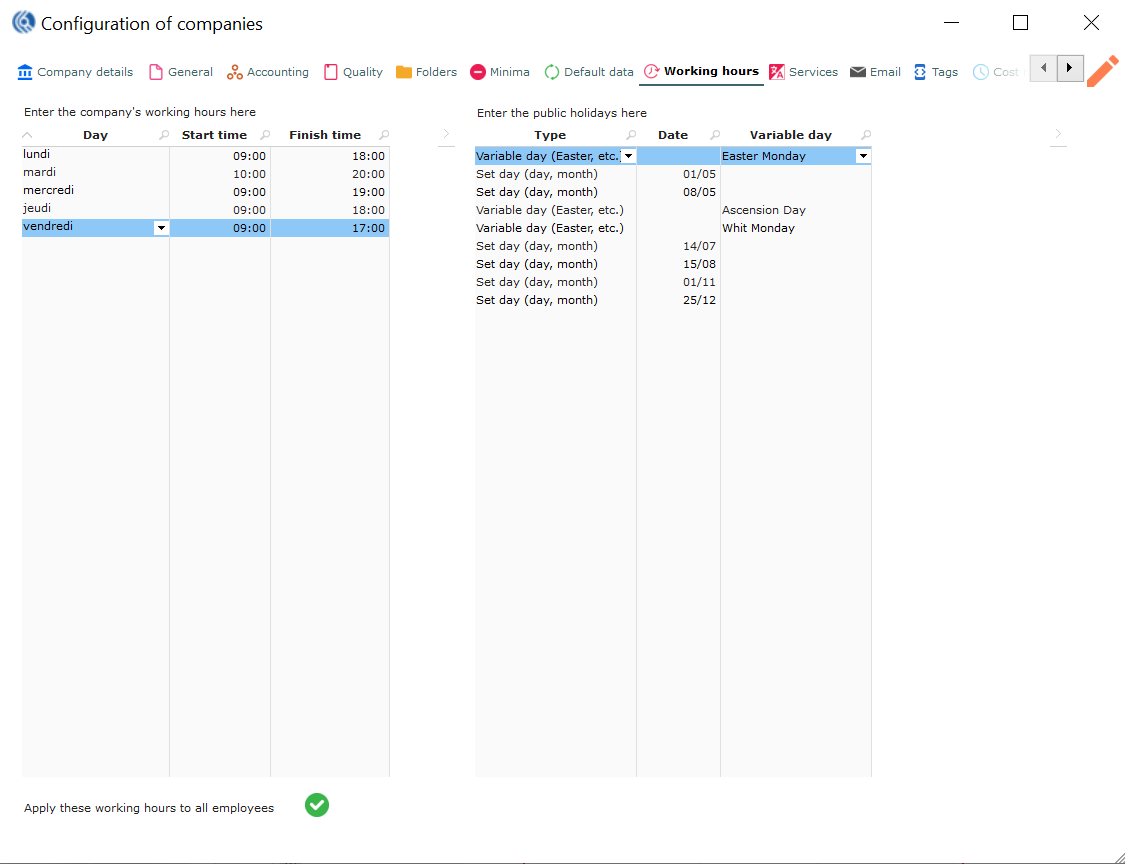
Enter your company’s opening hours:
Select the day Set start time Set finish time Apply to all your employees by clicking on the green check icon below the table
Tip: do not include break times in the business hours, so the automatic planning can be calculated more efficiently.

Companies menu: Working hours tab
Enter your company’s holidays:
Select the type Variable day: date changes every year Set day (day, month): repeating every year Set day (day, month, year): once for a specific year Insert holiday date If variable day, select which one
Companies menu: Services tab
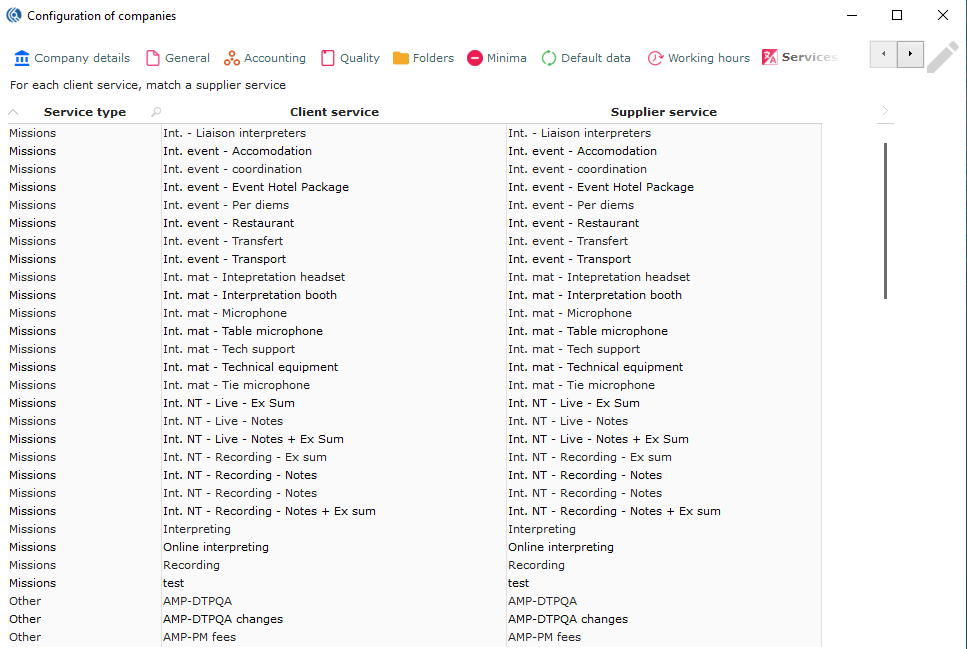 Services are set in Data “Services - Services”.
You can change supplier service match if needed.
Display the drop-down list to select the service.
Services are set in Data “Services - Services”.
You can change supplier service match if needed.
Display the drop-down list to select the service.
NB: very useful when you want to sell a translation + proofreading as a package deal. The client can see the service named translation+proofreading, but your supplier will see the service as translation only then the proofreading can be done in-house. Or you can also sell a “translation” to your client and buy a “post-edition” from your supplier.
Companies menu: Email tab
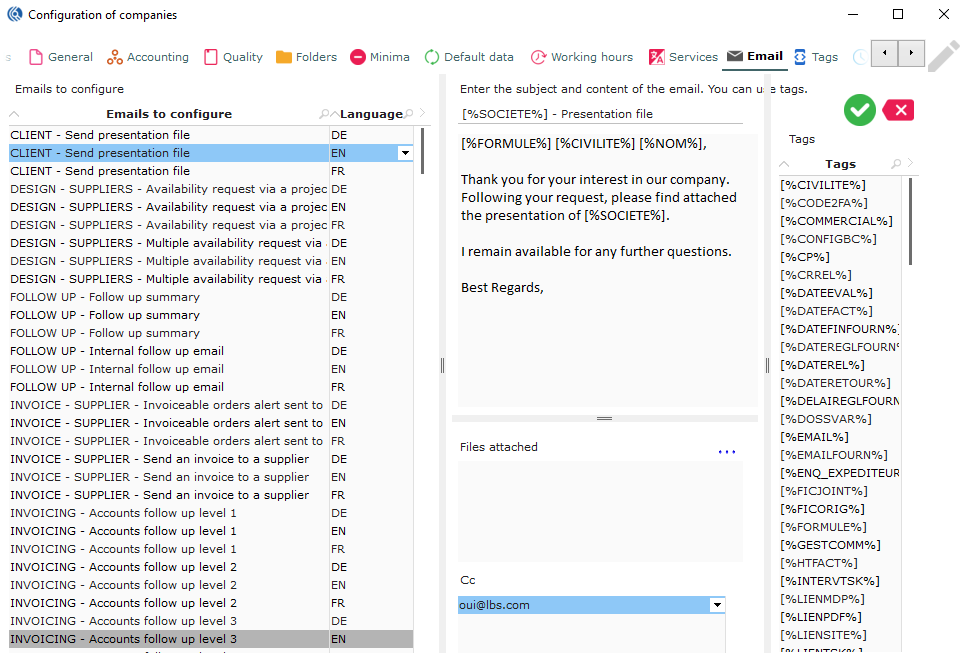 All emails are pre-configured for you. However, you may want to personalise them.
- Select the email that you would like to configure.
Companies menu: Email tab
 2. Enter your email subject that will appear in the email generated.
- Personalise your email. Use the Tags on the right table to insert variables if needed (See “Email configuration” Excel file for more help). Possibility to edit some tags (see slide 49).
Companies menu: Email tab
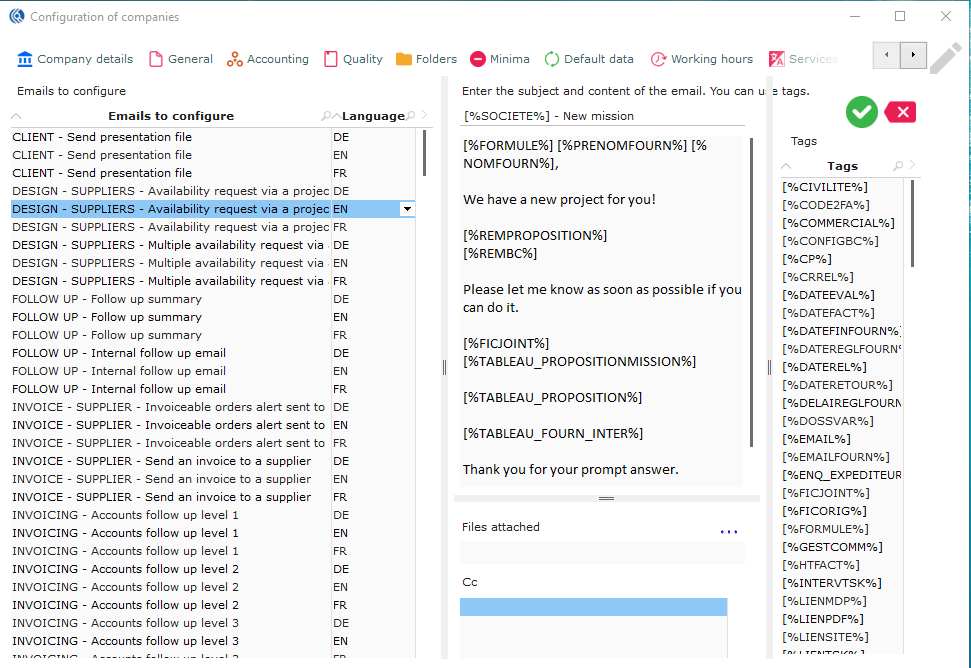 4. Click on the three blue dots icon to select files to be attached to the template email. Those files can only be fixed (no variables).
Companies menu: Tags tab
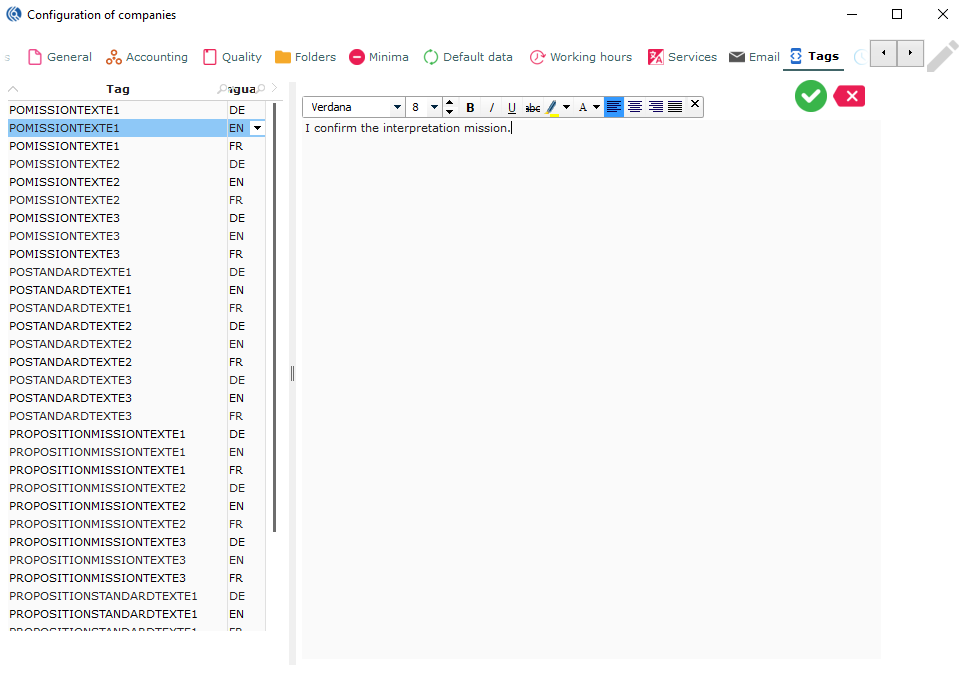 Edit personalised tags for some emails. These tags can be found in the tag list of the email configuration.
Companies menu: Cost management tab
-
Tick “Activate internal cost management” so that LBS Suite will count the time spent on each project (included automatic tasks and internal tasks), and the cost to get a net margin on projects.
-
Tick “Deactivate time management” so that LBS Suite stops counting automatically the time spent on automatic tasks (see the automatic tasks in Admin-Data-Tasks: tasks starting by “auto”). Then LBS will not be able to calculate the cost management. However, LBS will still calculate time spent on internal tasks inserted manually.
-
Tick “Display the schedule”, to activate the schedule view.

Companies menu: Cost management tab
- In “cost calculation” select the type of cost management calculation:
“Real hourly rates”: based on each user’s hour rate (it can be different from one user to another) and their actions on each project. “Average hourly rates”: based on an average cost across all your users (see below).
- If you have chosen “Average hourly rates”, set the average hourly costs for quotes and orders.

Companies menu: Cost management tab
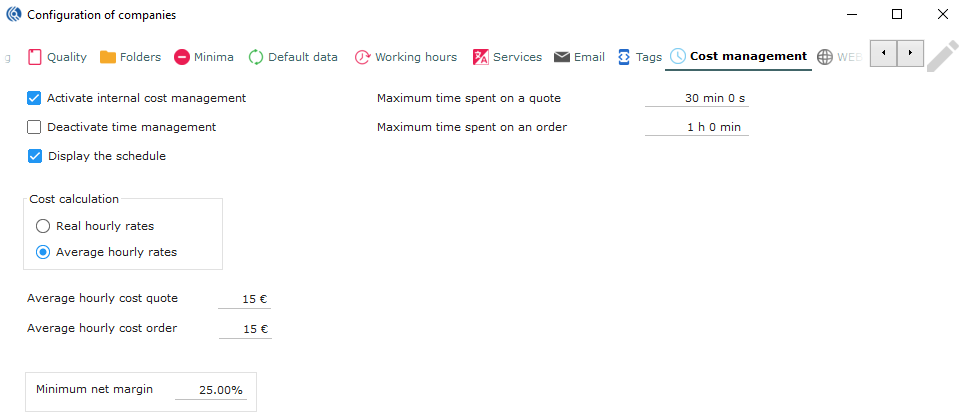 6. Set minimum net margin target.
Companies menu: Cost management tab
 In the “maximum time spent on a quote/order”, set the maximum time LBS can save automatically quotes and orders.
NB: This option prevents LBS from saving an overestimated time spent if a user forgets to close a quote or order while working on something else. Set 0 if you want LBS to calculate the time without limitation.
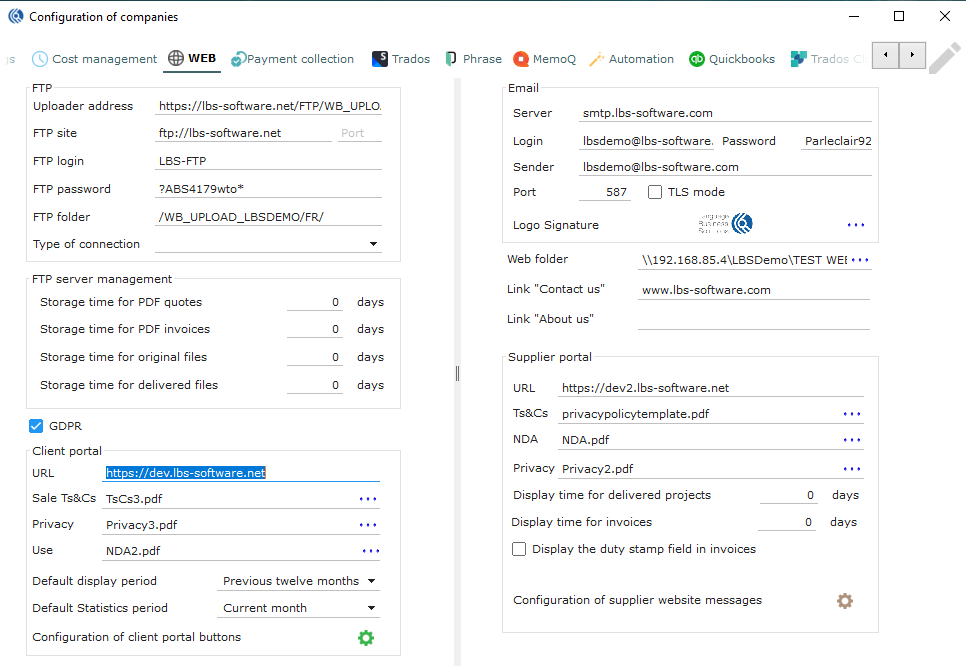
Companies menu: Web tab
 In FTP, set all necessary information of your company’s FTP.
The IT team should be configuring this.
In FTP, set all necessary information of your company’s FTP.
The IT team should be configuring this.
Companies menu: Web tab
- In “FTP server management set the number of days during which the documents will be stored on the FTP (on the portals). After “X” number of days all documents will be erased (from the portal, not from LBS).

Companies menu: Web tab
 3. Tick “GDPR” to show a “privacy” document when the client connects for the first time.
-
In “client portal”, set the chosen URL based on your own domain.
-
Click on the three little blue dots to attach your Sales terms and conditions to be accepted by the client when they place an order.
-
Click on the three little blue dots to attach your Privacy – GDPR document to be shown when the client first connects.
-
In “default display period”, select a default display period for new client web profiles. The portal will only display data to the client for this period. NB : It is also possible to personalise it in the contact record.
-
Set a default statistic period, so all the statistics will be calculated based on the selected period.
Companies menu: Web tab
- In “Email”, set all the configuration needed so that the FTP server can send automatic emails from actions from the portal and LBS. Select a generic email address that will send the automatic emails from the portal.
Companies menu: Web tab
-
In Web folder, set a folder path from which files so the uploaded documents on the portal can be saved here. They will be then dispatched in the subfolders configured in the Folders tab.
-
Set the links “Contact us” and “About us” here.

Companies menu: Web tab
-
In “supplier portal”, set your URL based on your own domain for your supplier portal.
-
For Ts&Cs (terms and conditions), click on the three blue dots to attach your Terms and conditions to be accepted by the supplier when accepting a service.
-
For NDA, click on the three blue dots to attach your NDA document to be accepted by your supplier when downloading documents or accepting a service.
-
For Privacy, click on the three blue dots to attach your Privacy document to be accepted by your supplier when downloading documents or accepting a service.
-
Set a “display period for delivered projects” by your suppliers. All projects delivered after this number of days will not be displayed on their portal.
17 . Set a “display period for invoices” of your suppliers. All invoices after this number of days will not be displayed on their portal.
- Tick “display the duty stamp” field in invoices if needed.

Companies menu: Web tab
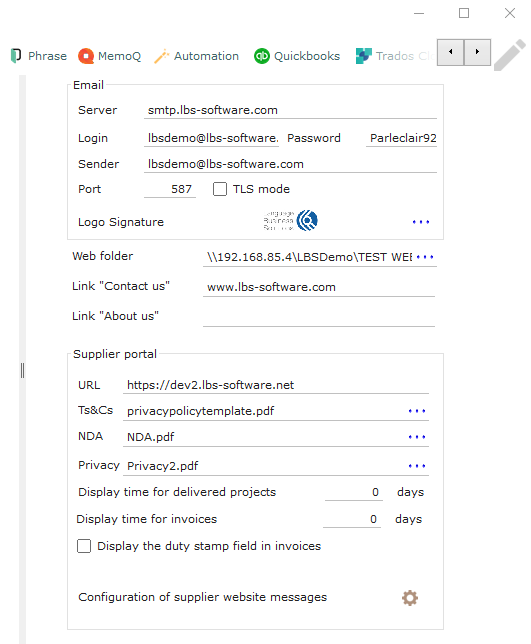
- Click on the brown cogwheel to configure various messages to display: Project pending message (when multiple offers sent) Project allocated message (when single offer sent)

Companies menu: Payment collection tab
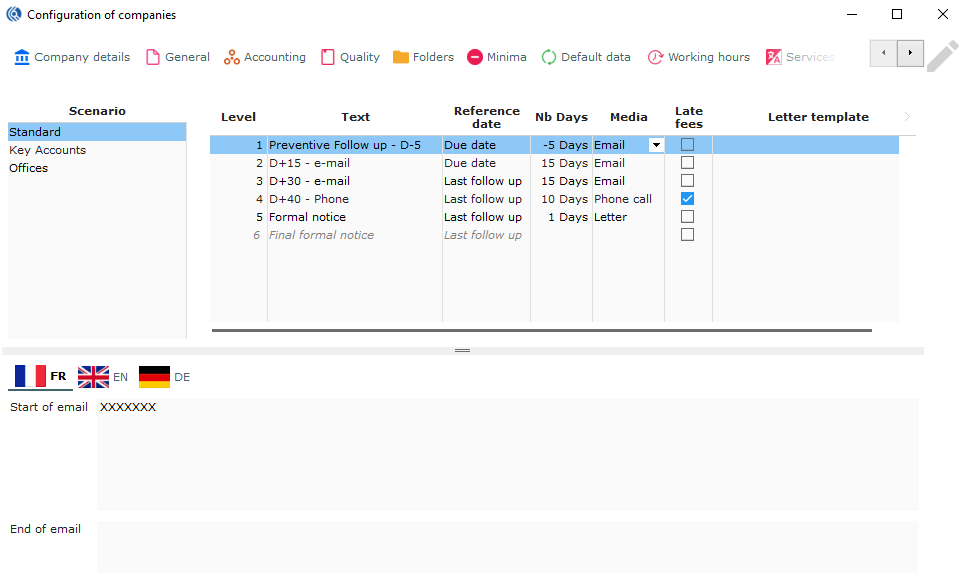
 In “scenario”, select the scenario to configure.
The list of scenarios is set in Data, “Accounting – Recovery Scenario”.
In “scenario”, select the scenario to configure.
The list of scenarios is set in Data, “Accounting – Recovery Scenario”.
In data “Accounting – Recovery Scenario” set your scenario type
Companies menu: Payment collection tab
-
In “text” set a name to the follow-up.
-
“Reference date” is automatically inserted.
-
In “nb days” set a number of days before (add “-”) or after the due date the follow-up should be done.
-
In “Media” set the like to use: Email, Phone call or Letter.
-
Tick “late fees”, if the level requires late fees to be applied.
-
Select the path of the template letter to be used if Letter media is used.
Companies menu: Payment collection tab
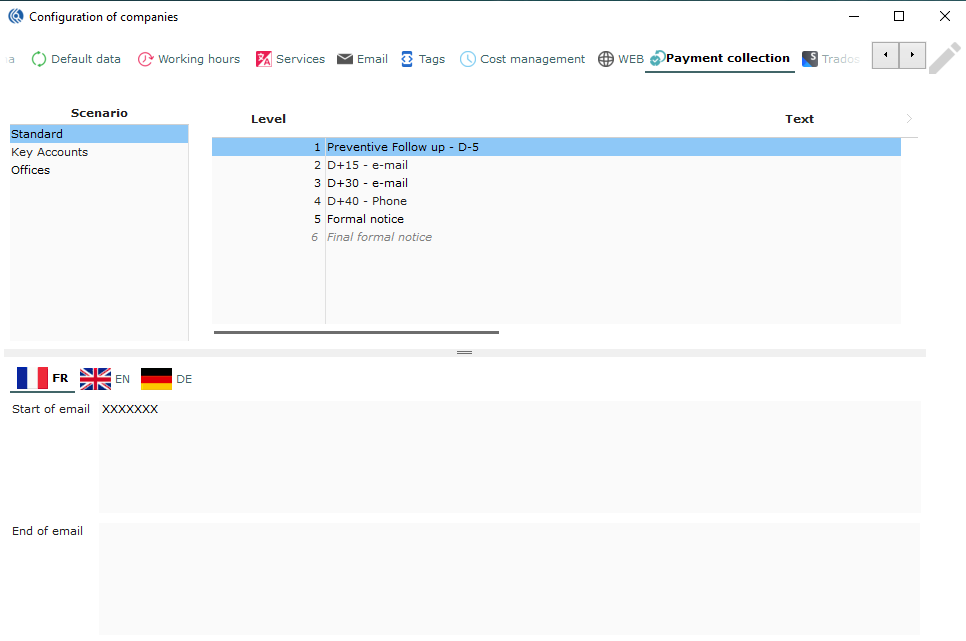
- In the bottom table, set a template message (one per language) that will be added to your Payment collection template email (see “Email” Tab). NB: Here, you can set two different messages for each level and scenario. Use tags to add these personalised messages to the template emails.
Companies menu: Trados tab
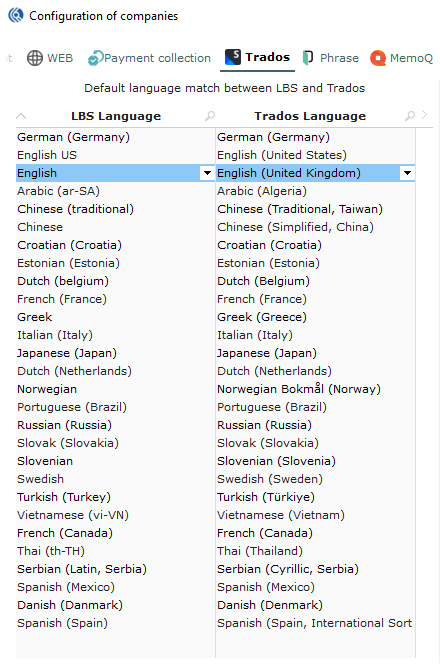
- Make the correspondence between LBS Suite’s languages registered in configuration (Data) and languages in Trados. The languages used in the system can be different from the ones in Trados (especially if several CATs are used). Here, LBS Suite is matching the right language in your CAT with the one you use internally.
Languages used in LBS Suite are set in Data “Services - Languages” first.
Tip: This is a general setting. This list can be imported to each client record. More languages can be added in the client record if necessary.
Companies menu: Trados tab
- Set a name for your GroupShare server.
- Set the GroupShare server URL.
- Select “SDL User”.
- Tick GroupShare, TM, and TB.
NB: If you are using several servers for SDL GroupShare, please contact our technical support to configure.

![]()
Companies menu: Phrase tab

- Make the correspondence between LBS Suite’s languages registered in the configuration (Data) and languages in Phrase. The languages used in the system can be different from the ones in your CAT tool (especially if several CATs are used). Here, LBS Suite is matching the right language in your CAT with the one you use internally.
Languages used in LBS Suite are set in Data “Services - Languages” first.
Tip: This is a general setting. This list can be imported to each client record. More languages can be added in the client record if necessary.
Companies menu: Phrase tab
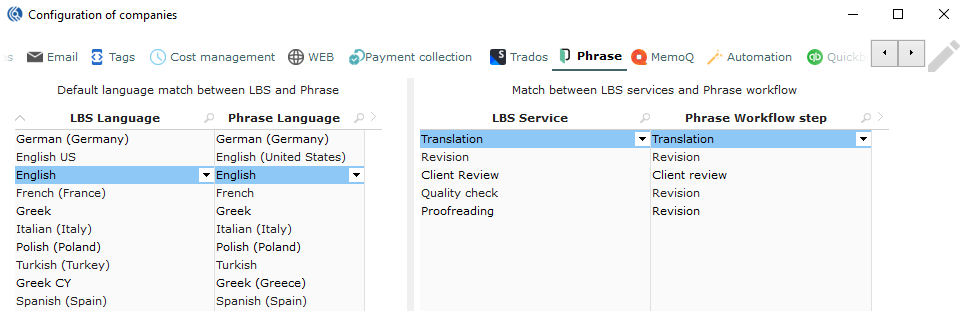
- Make the correspondence between LBS Services and Phrase workflow steps. This allows LBS to pair a Phrase workflow with an LBS service.
Companies menu: memoQ tab
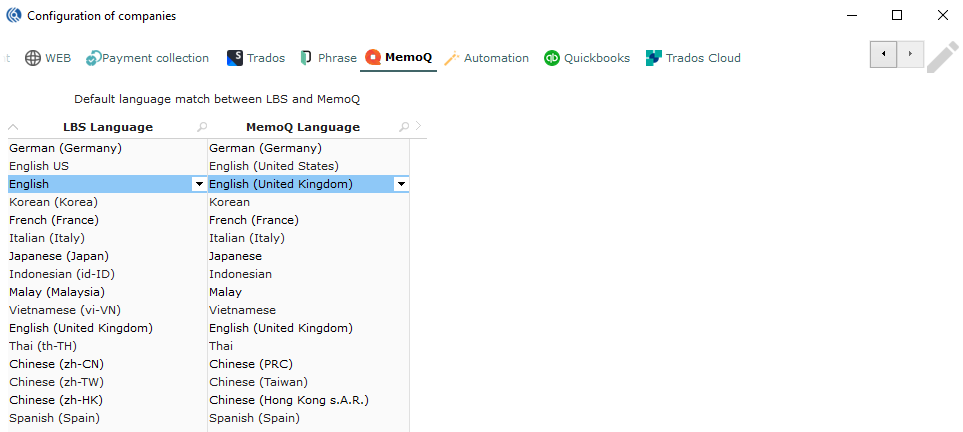
- Make the correspondence between LBS Suite’s languages registered in the configuration (Data) and languages in memoQ. The languages used in the system can be different from the ones in your CAT tool (especially if several CATs are used). Here, LBS Suite is matching the right languages in your CAT with the ones you use internally.
Languages used in LBS Suite need to be listed in Data “Services - Languages” first.
Tip: This is a general setting. This list can be imported to each client record. More languages can be added in the client record if necessary.
Companies menu: Automation tab
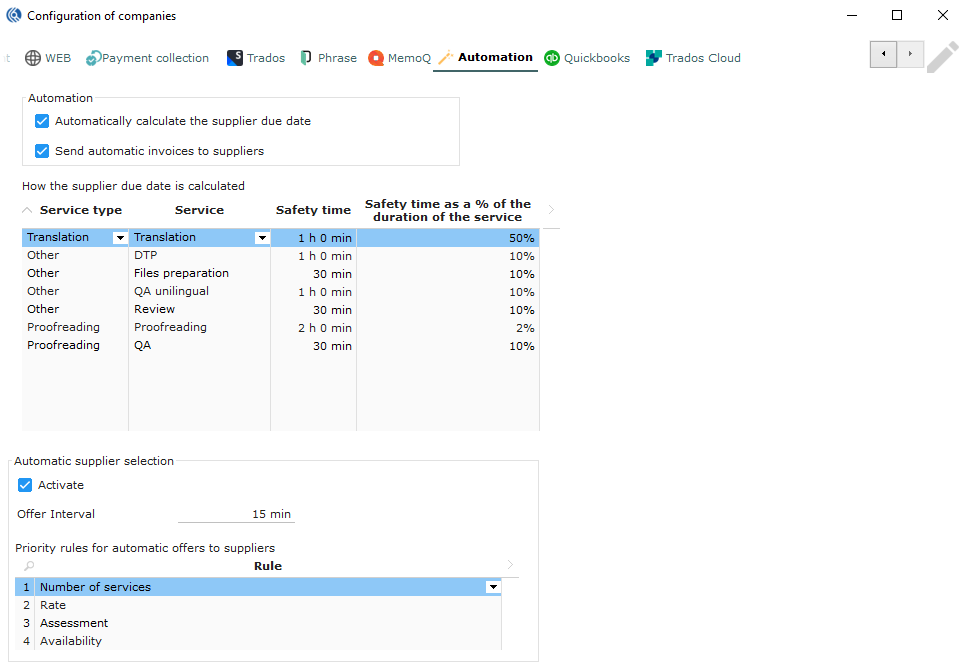
In “automation”, tick “automatically calculate the supplier due date” if needed.
Tick “send automatic invoices to suppliers” if needed. This will activate the self-billing. Accountants can then send invoices to suppliers, so they can be paid even before they send their invoices.
Companies menu: Automation tab
 In “How the supplier due date is calculated”:
-
Select a service type.
-
Select a service associated.
-
Set a safety time (deadline will be “X” before the start date of next step).
-
Set a percentage of the duration of the task. This duration will be the safety time (deadline will be “X” % time of the project before the start date of next step).
Companies menu: Automation tab
 7. In “automatic supplier selection”, tick activate if needed.
-
Set the offer interval time before a new offer is launched
-
In “Priority rules for automatic offers to suppliers”, choose a list of priorities for LBS to compare and check before selecting suppliers. (Here, LBS will first test the number of services the supplier has ongoing, then the rate, etc.)
NB: see “Supplier automation” doc for more info.
Companies menu: Trados Cloud tab
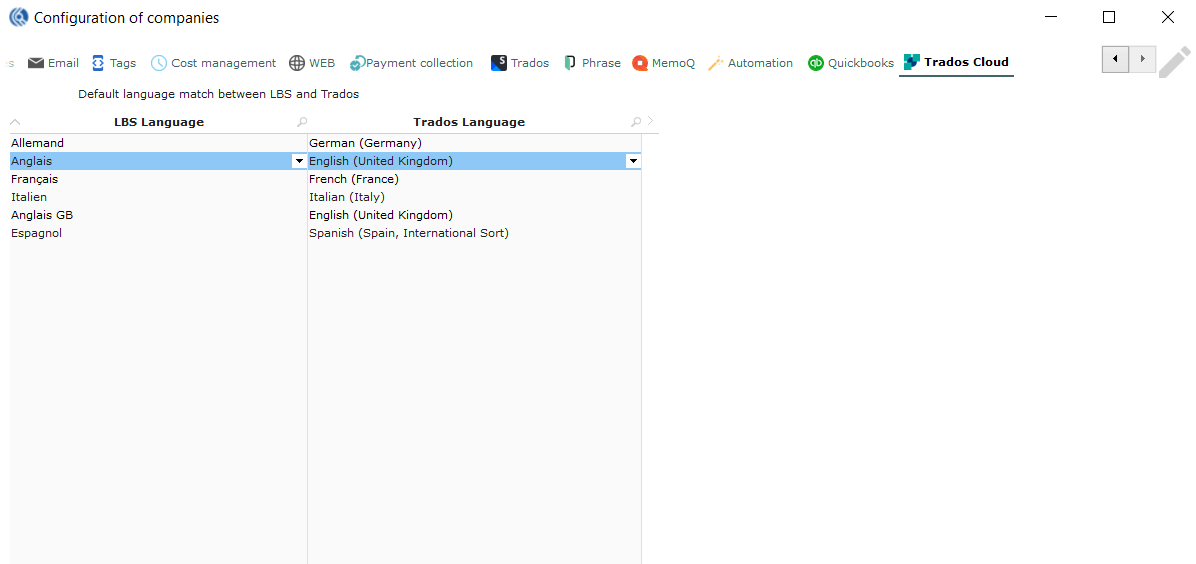
- Make the correspondence between LBS Suite’s languages registered in configuration (Data) and languages in Trados. The languages used in the system can be different from the ones in your CAT tool (especially if several CATs are used). Here, LBS Suite is matching the right language in your CAT with the one you use internally.
Languages used in LBS Suite need to be listed in Data “Services - Languages” first.
Tip: This is a general setting. This list can be imported to each client record. More languages can be added in the client record if necessary.